Self shooting video: a step-by-step guide to getting it right


In-person meetings might be the gold standard when it comes to fostering familiarity with your clients, but self-shot videos of you and your company might just run them a close second. Why? Because it’s a medium that works really well at capturing who you are, giving people a little sneak peek behind the scenes, and fostering brand loyalty.
We do appreciate that introducing yourself to the world can be a slightly strange experience, we’ve been there! But there are a number of compelling reasons to consider going for it:
- It builds the profiles of the people that make up your organisation
- It gives a personal touch that’s often missing in ultra-glossy videos
- It allows you to be reactive to the developments of your organisation and industry
- It creates those much-needed video alternatives that meet European Accessibility Act (EAA) guidelines (think press releases, internal comms etc)
- And probably the number one reason we’re seeing more of them? They’re incredibly cost effective!
Viewers are now far more forgiving of self-shot content than they were even a few years ago, so don’t worry if your budget doesn’t stretch to perfectly lit, noise-treated studios. Authenticity is the keyword here: you’re the experts, you’re the people current or potential clients will be speaking to.
Top tips for getting started with self-shooting film
‘Before you start filming, it is absolutely essential to plan down to the finest of details, and then you get on set and rip it up on day one.’ Niko Pueringer – Corridor Digital
We’ve put together a step-by-step guide to getting the most out of the filming kit you probably already own, leaving you to concentrate on what it is you really want to say.
Clothes – no intricate patterns please
Phone cameras and webcams struggle to capture complex or small-print patterns. This results in a visual distortion (known as moiré) that makes it appear as if your clothing is jittering or jumping. It can also soften the overall image thanks to the available bandwidth being taken up in attempting to capture the patterns. It’s safest to stick to plain colours. Sorry to those with a love of jazzy shirts!
Lighting and shooting – daytime is best and place large light sources correctly
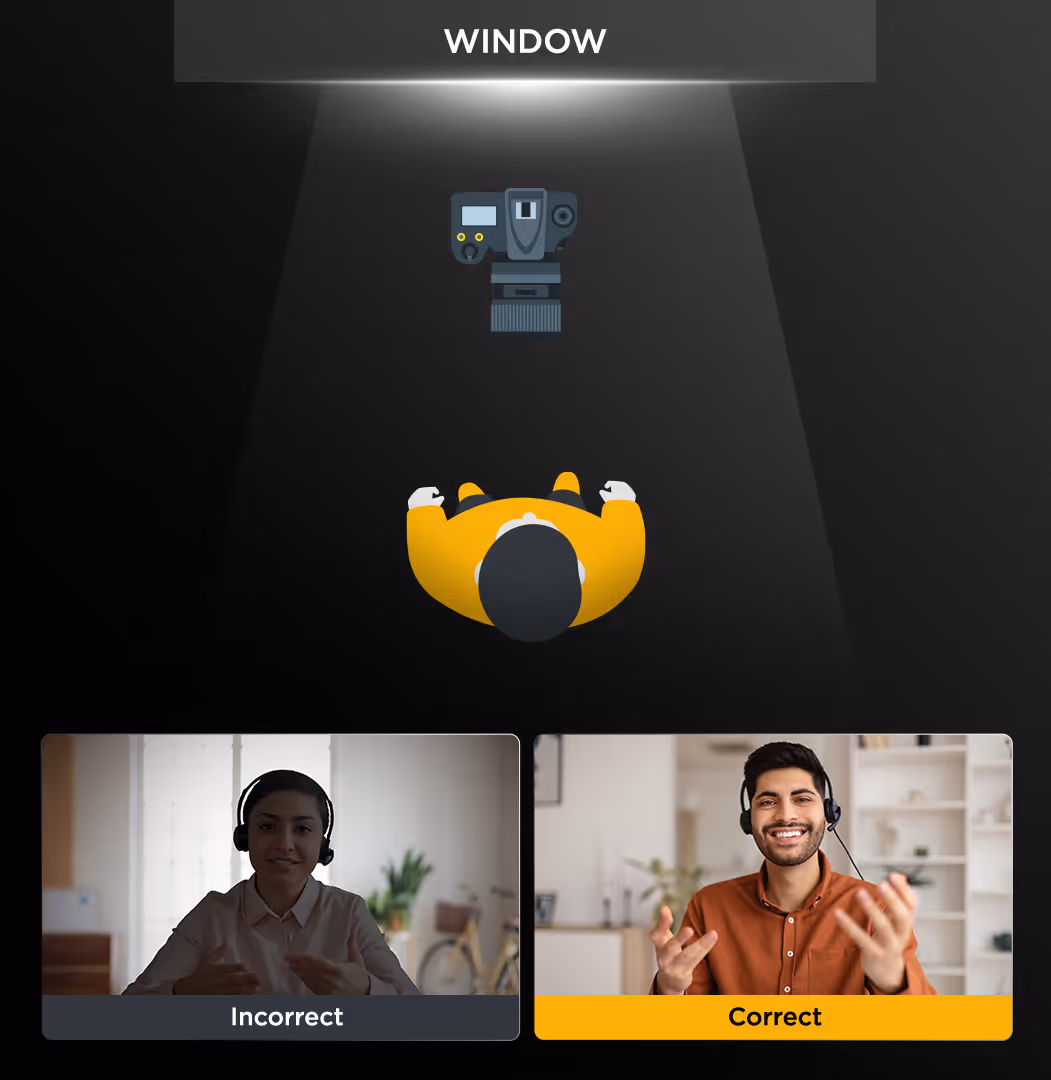
Cameras can struggle to capture the full dynamic range (this is the difference between the brightest and darkest parts of an image that our eyes can see). Filming with a window behind you will create a very large bright object with a shady silhouette of you in the middle. Atmospheric but not very informative.
Cameras love light, the brighter and more evenly lit your shot, the better it will look. Aim to shoot with any windows behind the camera, this way you are nicely lit with the brightest light available to you.
Try to shoot during the day when there is plenty of natural light. Shooting at night using household lights will force the camera to ‘work harder’. In a similar way to what happens when you turn up the volume on a stereo, this will create more distortion in the image.
If in any doubt, record a little segment and watch it back. You may notice that lamp behind you is appearing much brighter than you were expecting. Not a problem, just move it out of shot while you’re filming.
Camera – use the best you have access to
Don’t be afraid of using your phone, if it was good enough for Danny Boyle then it’s ok with me. Yes, I love the footage from our professional-grade cameras, but sometimes the ability to whip a phone out and start filming in a matter of seconds, all to a good enough standard, is the best option.
Sound - minimise noise as much as possible
Viewers may be relatively relaxed about the visual quality of a video, but they do expect good quality sound. Think about what time you’re going to shoot: if you know the 10:15 to Cardiff always passes your window promptly, why not push filming back to 10:30 onwards?
You can massively improve the quality of your video by buying a cheap lavalier (clip-on) mic. Something like a Rode Lavalier Go is cheap, sounds much better than the audio captured on a camera mic, and is really straightforward to use. Most phones will have a free audio notes app and these are also a great option as portable audio recorders.
Script – have a decent first draft prepared
Deciding what format your video will take is a great start; is it going to be an interview or open discussion for example? Writing a rough script in advance can help clarify your thoughts. Go through and highlight the key phrases that remind you what you want to say, then write down just the highlighted phrases and use this as a prompt.
Equally, you may feel more comfortable just discussing the subject on the spot, and this often leads to the best outcomes: not overthinking answers can result in more natural footage.
It may be helpful to ask someone to sit behind the camera and deliver your answers to them. For most people it feels more natural speaking to a person rather than a camera.
Give it a few takes
If you’re anything like me on camera, I tend to relax a bit after the first couple of minutes (apologies in advance for the pre-prepared bad jokes I have stashed to cover those first-minute nerves!).
The lesson? Record a couple of takes. Sure, 80% of them will be similar, but occasionally you’ll nail a particular section that bit better and FGTOLOCAO (Finally Get That Overly Long Overly Complicated Acronym Out).
Planning on editing a few people together? A mix of answers can prove invaluable. A longer speech is great for covering a topic in more detail. A short sound bite is great to quickly reaffirm another person’s view or offer the counter narrative.
And finally, the ummms and ahhhs
Compared to how we write, we speak and act very differently. We have a habit of adding ‘ummms’ and ‘ahhs’ (it’s a natural way our body creates some breathing space to recall and form the next statement). You might also have noticed that people often blink after finishing a sentence, editors often describe this as the body’s way of editing the world around it and creating some order (we’re very much artists, not scientists).
Viewers tend to prefer a well thought out answer to a perfectly polished one. If you want to re-shoot then, by all means, feel free but don’t worry about perfection: sincerity is the key here.
Why not add some professional polish?
Our Video Toolkits give you the tools to brand your videos consistently, but more importantly, they’re super easy to implement. We’ve talked about these before, but it’s well worth a look!
Most importantly, don’t forget you can do as many takes as you feel comfortable with. And you might just enjoy it!
If this has left you with burning questions about self-shooting, or any other video-related stuff, then please do feel free to get in touch at marketing@proctorsgroup.com